
Showing posts with label Autodesk Vault. Show all posts
Showing posts with label Autodesk Vault. Show all posts
Thursday, January 11, 2018
Autodesk Vault Custom Numbering Schemes
Autodesk Vault Workgroup and Vault Professional offer an automatic number system to aid companies in the management of their design files. This system can be configured to add intelligence and clarity to file naming in Vault Workgroup and Vault Professional and to Items and Change Order naming in Vault Professional. Once the numbering system in configured, it can be used directly from the CAD applications, logged into the Vault as well as the Vault Client itself. Please take a look at the attached video to see the configuration options of the system and the use of the system in Autodesk Inventor and the Vault Client.


Thursday, July 20, 2017
Creating Autodesk Vault Viewing Filters
Autodesk Vault offers a myriad of ways to find, filter or sort file types in order to define a specific group of files for viewing or other operations. In this article I would like to focus on the filter options. For example, in a Vault folder I would like to filter the "Entity Type" column to only show Inventor IDW files. A filter applied to the column can quickly filter out all other file types as shown below. Notice the filter call-out shown at the bottom of the list.

The first thing I want to show are the two basic ways to add a filter to the contents of the current displayed Vault folder. All of my work will be done using the Main Panel display. I will be using the "Entity Type" column but all these methods can be applied to any visible column. I want to create a filter to show only the Inventor IPT files. In one method, I left click on the small "down arrow" icon in the upper right corner of the column header. In the case of the "Entity Type" column header it can be hard to see but you can easily hit it with a little practice. Below I am showing this arrow in "Name" column just to show you the location.

Left clicking on this icon in the "Entity Type" column will display the option dialog box. It is pretty obvious the first method to create the filter is to simply select the file extension desired from the list. The list, by the way, only shows the available files types contained in this folder. I will select ".ipt" from the list to set the filter.
 The result will be as shown.

The second method in located the same left click menu and is not quite as straight forward as the first method but it also offers more options. Select "(Custom)" from the list.

In the Custom AutoFilter dialog box you can select the first column drop-down arrow to pick the condition the filter will use and the second column drop-down arrow to pick from the type of files contained in the folder. The dialog box also offer the opportunity to add another set of conditions and file types using a Boolean "And" "Or" statement. My selection below will filter the folder to show only IPT or IDW files.

During the same Vault Client session, after a filter has been applied to a folder using the drop down list, the previous filter selection(s) will be displayed above the double line allowing for quick selection. You can use the "X" to remove these if desired.

Once you have created a folder filter, the current filter will appear at the bottom of the folder. There are a few controls located on this filter display which are described below.


Once in the Filter Editor dialog box, the options are almost endless. Left clicking on individual entries will display options related to the entry you selected. For example, if I select the "Or" in the filter editor it will display the other possible conditions.
 Each word of each filter is linked to other options so I suggest you spend a couple of minutes and just left click on everything to see some of the possibilities. You have the ability to add and remove filters in the editor as well.
 Once you are finished, select either "Apply" or "OK" depending on your needs to finish the editing process.
Once you have applied filters to a folder, you need to learn when they are applied and when they are automatically removed. Filters applied to one folder are also applied to other folders when selected from the Navigation Panel. There are exceptions to this rule and I will let you find them yourself. Using a "Shortcut" will automatically remove a filter unless the shortcut was created on a folder containing a filter. In this case the shortcut will set the folder current and automatically apply the filter condition when it is selected. You cannot remove the filter and then expect the shortcut to return the filter however.
The last thing I would like to mention is how to save a filter as a configured Vault Client view. The first thing to do is create an "empty" custom view. Select the drop down arrow in the view display window and pick "Define custom views..." from the list.
 In the Manage Custom Views dialog box, select "New" and create a view name which describes what the view will display. Select "OK" to create the new view.

At this point you could configure the new view from this dialog box using the "Modify.." icon but this time I want to show you how to modify the view by creating a folder filter. Select "Close" to return to the full Vault Client display. Notice that the view I just created is displayed in the view window. If you selected another folder, the view will be set back to Default View. Select a folder that contains some IDW files and then reset the view window to IDW Files Only.
 Next, create a filter to show only IDW files in the current folder using one of the methods shown earlier. Next right click on the Entity Type column header and select "Apply Setting To Current View" from the context menu.
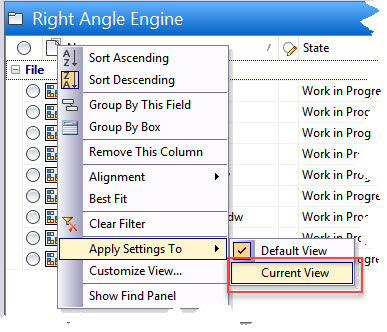
This will assign the filter to the IDW Files Only view saving it for future use in other folders. One thing to keep in mind, these views are only active in the folders they were selecting in. If you select a different folder, the view will return to Default View. While in the new folder selecting the view IDW Files Only will assign that view to the current folder until you change the view again even if the application is closed and then restarted.
Creating the filters and views you need for effective use of the Vault Client is an easy way to only display the files you need for certain tasks. I will leave you with the reminder that filters can be applied to ANY column including custom columns created from your custom Vault properties.

The first thing I want to show are the two basic ways to add a filter to the contents of the current displayed Vault folder. All of my work will be done using the Main Panel display. I will be using the "Entity Type" column but all these methods can be applied to any visible column. I want to create a filter to show only the Inventor IPT files. In one method, I left click on the small "down arrow" icon in the upper right corner of the column header. In the case of the "Entity Type" column header it can be hard to see but you can easily hit it with a little practice. Below I am showing this arrow in "Name" column just to show you the location.
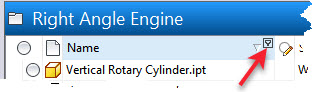
Left clicking on this icon in the "Entity Type" column will display the option dialog box. It is pretty obvious the first method to create the filter is to simply select the file extension desired from the list. The list, by the way, only shows the available files types contained in this folder. I will select ".ipt" from the list to set the filter.

The second method in located the same left click menu and is not quite as straight forward as the first method but it also offers more options. Select "(Custom)" from the list.
In the Custom AutoFilter dialog box you can select the first column drop-down arrow to pick the condition the filter will use and the second column drop-down arrow to pick from the type of files contained in the folder. The dialog box also offer the opportunity to add another set of conditions and file types using a Boolean "And" "Or" statement. My selection below will filter the folder to show only IPT or IDW files.

During the same Vault Client session, after a filter has been applied to a folder using the drop down list, the previous filter selection(s) will be displayed above the double line allowing for quick selection. You can use the "X" to remove these if desired.
Once you have created a folder filter, the current filter will appear at the bottom of the folder. There are a few controls located on this filter display which are described below.

- Selecting the "X" will remove the folder filter. Once removed you will have to create another one to access these controls.
- Selecting the check mark will temporarily deactivate the folder filter. Selecting it a second time will make the filter active.
- Selection the drop down arrow will revel any previous filters which were created for this folder during the current computer session. Filters are maintained between Vault sessions under certain circumstances. Selecting one of these filters will make it active.
- If the drop down list is showing, you can select the "X" to remove the related filter from the list.
If you would like to edit the current active filter, select the "Edit Filter" icon located on the same display bar at the right hand side.

Once in the Filter Editor dialog box, the options are almost endless. Left clicking on individual entries will display options related to the entry you selected. For example, if I select the "Or" in the filter editor it will display the other possible conditions.
Once you have applied filters to a folder, you need to learn when they are applied and when they are automatically removed. Filters applied to one folder are also applied to other folders when selected from the Navigation Panel. There are exceptions to this rule and I will let you find them yourself. Using a "Shortcut" will automatically remove a filter unless the shortcut was created on a folder containing a filter. In this case the shortcut will set the folder current and automatically apply the filter condition when it is selected. You cannot remove the filter and then expect the shortcut to return the filter however.
The last thing I would like to mention is how to save a filter as a configured Vault Client view. The first thing to do is create an "empty" custom view. Select the drop down arrow in the view display window and pick "Define custom views..." from the list.

At this point you could configure the new view from this dialog box using the "Modify.." icon but this time I want to show you how to modify the view by creating a folder filter. Select "Close" to return to the full Vault Client display. Notice that the view I just created is displayed in the view window. If you selected another folder, the view will be set back to Default View. Select a folder that contains some IDW files and then reset the view window to IDW Files Only.

This will assign the filter to the IDW Files Only view saving it for future use in other folders. One thing to keep in mind, these views are only active in the folders they were selecting in. If you select a different folder, the view will return to Default View. While in the new folder selecting the view IDW Files Only will assign that view to the current folder until you change the view again even if the application is closed and then restarted.
Creating the filters and views you need for effective use of the Vault Client is an easy way to only display the files you need for certain tasks. I will leave you with the reminder that filters can be applied to ANY column including custom columns created from your custom Vault properties.
Sunday, July 16, 2017
Changing the Default Workspace in Autodesk Vault Autoloader
Along with the installation of the Autodesk Vault Client all versions will also install the Autodesk Autoloader <version> for <Vault type>. After installing the Autodesk Vault Professional Client 2018, you will find the Autodesk Autoloader 2018 for Vault Professional under the Data Management programs folder. The main purpose of the Autoloader application is to provide a method of adding files to the Vault by folder(s) as well as creating visualization files, if desired, for all applicable files.
This article will not cover the use of Autoloader but will explain how to configure the default Vault workspace and library folder used by the application. By default the Vault workspace folder must be named "Designs" and the library folder must be "Libraries" in order to use the Autoloader. Theses names may not be acceptable to your company. In this example I have named my Vault workspace folder "Projects" and I used the default library folder name of "Libraries".
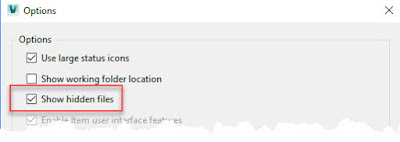
 The first step is to configure the Vault Client to "Show hidden files". Select "Tools" from the menu bar and then "Options" from the drop down list.
 In the Options dialog box, place a check box is the box before "Show hidden files". Select "OK" at the bottom of the dialog box to finish.
 If you have not run the Autodesk Autoloader since you created the company Vault database you will not see the necessary configuration file. Navigate in your Windows program directory and run the Autodesk Autoloader <version> for <Vault type>. You will run the application and allow it to create the default configuration file in the Project Explorer ($) folder. On the first screen simply select "Next" to move to the Select Data Source dialog box. Use the "Select Folder" icon to browse to the folder containing the CAD files you want to add to the Vault. It is not import which folder you select but make sure the folder contains some CAD files. In my case my folder contains a small Inventor assembly, parts and 2D drawings. Select "OK" to continue.

You will immediately will be placed into the "Select Project" dialog box. Here you will
"Browse" and select the Inventor project file which will resolve all the files in the folder selected above. This is a topic in itself and I will not cover the ins and outs of which Inventor project file to use in this article. Double left clicking on the project file will place a check mark beside it. Select "OK" to continue.

You will now see a listing of the files, and folders if they exist, under the folder you select earlier. You can remove any files or folders you desire because you actually only need one file to continue with the process. Select "Next" to continue.

In the Data Scan & Report dialog box, select "Scan" to start the file validation process. Once the process in complete you will receive an alert saying the process in complete. At this point the "Errors in validation" count must be "0" or the "Next" button will not be available. If there is an error in validation the dialog box will inform you of the problem beside each file in the "Status" column. I will assume you can select "OK" to close the completion dialog box and then the "Next" icon to move on.

The next dialog box is the familiar Vault log-in dialog box. You must have administrator privileges to log in when using the Autoloader. Once you enter your credentials, select "OK" to continue.

In the Map Vault Folders dialog box, I am going to select the "Target Location ..." to select the location for the placement of the DP Unit files. In the resulting dialog box Mapping for "DP Unit", you will notice I do not have a choice of selecting my "Projects" workspace only the default "Designs" which is default. Select "Cancel" in the Mapping for "DP Unit" dialog box to close it.

I will do the same thing for the Standard Parts "Target Location...". This time the availability of the "Libraries" folder is present so the default location suits my purpose.

I must stop the process and correct the target location for the non-library files. Select "Cancel" on the Mapping for "Standard Parts" dialog box to close it and then select "Cancel" on the Map Vault Folders dialog box to end the Autoloader process. Acknowledge the message you wish to quit the application.
Move back to the Vault Client and select "Refresh" from the menu bar or press "F5" on the keyboard. You will notice a configuration file called "BUU.xml" shows up in the Project Explorer ($) folder which was created by the Autoloader process I just finished. You will also notice a new "Designs.ipj" Inventor project file which was created by the Autoloader. We will remove this is a minute.
 The next thing is the right click on the "BUU.xml" file and select "Check Out" to get a copy to your local Vault workspace and to make it available to modify. Next right click on it again and select "Go to Working Folder". This will place you in your local workspace ready to edit the .xml file.

Using the Windows Notepad application, open the "BUU.xml" file. There are only two lines that you may need to modify, in my case only one since the "Libraries" entry is correct. For my situation all I will change is the word "Designs" to "Projects" to match my Vault workspace folder name. Once this is done, save and close the text file.
 Back in the Vault Client, right click on the "BUU.xml" file and select "Check in.." from the context menu. There is really no need to add a comment to the Check in dialog box since the file is normally hidden. Select "OK" to finish the check in process.
 Next right click on the "Designs.ipj" file and delete it from the Vault. Next select "Tools" from the Vault Client menu and then "Options" from the drop down menu. Deselect the "Show hidden files" then "OK' to close the Options dialog box.

I need to delete the "Designs" folder from the Vault which was created by the Autoloader default configuration process earlier in the process.

I am finished with the configuration change. The next time I use the Autoloader the "Projects" folder will be available for mapping the non-library files.

It is a long process but you only have to do it once for each company Vault which is normally only one.
This article will not cover the use of Autoloader but will explain how to configure the default Vault workspace and library folder used by the application. By default the Vault workspace folder must be named "Designs" and the library folder must be "Libraries" in order to use the Autoloader. Theses names may not be acceptable to your company. In this example I have named my Vault workspace folder "Projects" and I used the default library folder name of "Libraries".


You will immediately will be placed into the "Select Project" dialog box. Here you will
"Browse" and select the Inventor project file which will resolve all the files in the folder selected above. This is a topic in itself and I will not cover the ins and outs of which Inventor project file to use in this article. Double left clicking on the project file will place a check mark beside it. Select "OK" to continue.

You will now see a listing of the files, and folders if they exist, under the folder you select earlier. You can remove any files or folders you desire because you actually only need one file to continue with the process. Select "Next" to continue.

In the Data Scan & Report dialog box, select "Scan" to start the file validation process. Once the process in complete you will receive an alert saying the process in complete. At this point the "Errors in validation" count must be "0" or the "Next" button will not be available. If there is an error in validation the dialog box will inform you of the problem beside each file in the "Status" column. I will assume you can select "OK" to close the completion dialog box and then the "Next" icon to move on.

The next dialog box is the familiar Vault log-in dialog box. You must have administrator privileges to log in when using the Autoloader. Once you enter your credentials, select "OK" to continue.

In the Map Vault Folders dialog box, I am going to select the "Target Location ..." to select the location for the placement of the DP Unit files. In the resulting dialog box Mapping for "DP Unit", you will notice I do not have a choice of selecting my "Projects" workspace only the default "Designs" which is default. Select "Cancel" in the Mapping for "DP Unit" dialog box to close it.

I will do the same thing for the Standard Parts "Target Location...". This time the availability of the "Libraries" folder is present so the default location suits my purpose.

I must stop the process and correct the target location for the non-library files. Select "Cancel" on the Mapping for "Standard Parts" dialog box to close it and then select "Cancel" on the Map Vault Folders dialog box to end the Autoloader process. Acknowledge the message you wish to quit the application.
Move back to the Vault Client and select "Refresh" from the menu bar or press "F5" on the keyboard. You will notice a configuration file called "BUU.xml" shows up in the Project Explorer ($) folder which was created by the Autoloader process I just finished. You will also notice a new "Designs.ipj" Inventor project file which was created by the Autoloader. We will remove this is a minute.

Using the Windows Notepad application, open the "BUU.xml" file. There are only two lines that you may need to modify, in my case only one since the "Libraries" entry is correct. For my situation all I will change is the word "Designs" to "Projects" to match my Vault workspace folder name. Once this is done, save and close the text file.


I am finished with the configuration change. The next time I use the Autoloader the "Projects" folder will be available for mapping the non-library files.

It is a long process but you only have to do it once for each company Vault which is normally only one.
Wednesday, June 28, 2017
Viewing Visualization Files in the Autodesk Thin Client
The Autodesk Thin Client (ATC) is a web based application which is furnished with Autodesk Vault Professional and can be installed on as many workstations as desired. It does not require any licensing but it does have some restrictions. These are:


- The workstation running ATC must be able to ping the Autodesk Data Management Server (ADMS). In other words, the workstation must be same sub-network as the ADMS.
- The user must have a valid ADMS account with necessary permissions. This can be accomplished either with a Vault Account log-in or with Microsoft Windows Authentication.
- The workstation must have one of the supported web browsers. I have tested four, three of which do not show DWF visualization files directly. More on this later.
- The workstation running ATC must have a copy of the free Autodesk viewer Design Review (ADR) installed.
The Autodesk Thin Client offers a view into the Vault content non-CAD users in your company. These users can view which files are released and their revision status, properties of files and if your company is using Vault Professional, they can view bill of materials of assemblies. There are many other tasks that ATC offers non-CAD users. This article is not trying to cover the uses of the Vault but will try and concentrate on the one task of viewing the CAD files contained in the Vault by using the generated DWF or DWFx visualization file created by the Vault during the CAD application check-in process.
Autodesk is dependent on the web browser and its ability to handle the necessary ADR add-in or extension to show the DWF file in full screen mode. Currently Microsoft Internet Explorer (IE) is the only current web browser that can accomplish this. I am currently using IE version 11. It must be configured according to the specifications shown on this Autodesk website. If you are using an older version of Chrome or Firefox, they too can be configured to display the DWF file in full screen mode.
If your company uses a current version of Chrome or Firefox, you can use the ATC to its full potential if you modify the workflow for viewing DWF files in full screen mode. The process to do this starts with your Vault administrator configuring the ATC to "Restrict download of file with visualization attachment" by placing a check mark in the ATC Settings dialog.

The Setting dialog box can be found from the ATC webpage at the following location.

When you log into ATC you will navigate to and open the folder containing the files you wish to view. The modified workflow requires you to open the file and bypass selecting the "Preview" icon beside each file in the folder. If you select this command a blank window will open in your browser stating that you are missing the ADR add-in. Once you have opened the file left click on the "Actions" icon on any thumbnail image and then select "Download Visualization".
 The next step it to decide how you want to save and open the DWF visualization file. I will demonstrate how to make them open by default allowing you to go directly into ADR. In Chrome you will need to save the first file you download and then right click on the Chrome download icon in the lower left of the browser window. Select "Always open files of this type" from the context menu.

Then next time you select "Download Visualization" in ATC, it will open up ADR automatically and display the DWF file. The only downside is that each time you do this the process will open up a new instance of ADR.
The process is the same in Firefox up to the Opening dialog box. In the Opening dialog box verify that the radio button "Open with Autodesk DWF Application (default) is selected and place a check mark in front of "Do this automatically for files like this from now on." Once you select "OK" it will automatically open up ADR and display the DWF file.
If you are using Microsoft Internet Explorer you can left click on the any available "Preview" icon to open up the DWF file inside the web browser.
 If you would like to open up the file inside the ADR application from this view, simply right click and the image and select "Open in DWF Application" from the context menu.

In Microsoft Edge, the newest web browser option in Windows 10, the process is also the same as in Chrome and Firefox except a message box will open at the bottom of the browser asking you the operation you would like to use with the DWF file. I could not find a way to make this the default operation.

Of course all these methods will not work if the Vault does not contain DWF or DWFx files for all checked in CAD files. There is a "Update Visualization" icon on the file viewing page in the ATC which can be used to update or create a missing visualization file in the Vault. Its use is dependent on the Autodesk Job Processor availability. Check with your Vault administrator before attempting to use this function.
If a DWF or DWFx file does not exist in the Vault for the file you are attempting to view, the "Actions" icon will show the option to download the actual file itself. This is not normally a desirable action and Autodesk is currently working on a fix to the situation.


Then next time you select "Download Visualization" in ATC, it will open up ADR automatically and display the DWF file. The only downside is that each time you do this the process will open up a new instance of ADR.
The process is the same in Firefox up to the Opening dialog box. In the Opening dialog box verify that the radio button "Open with Autodesk DWF Application (default) is selected and place a check mark in front of "Do this automatically for files like this from now on." Once you select "OK" it will automatically open up ADR and display the DWF file.
If you are using Microsoft Internet Explorer you can left click on the any available "Preview" icon to open up the DWF file inside the web browser.


In Microsoft Edge, the newest web browser option in Windows 10, the process is also the same as in Chrome and Firefox except a message box will open at the bottom of the browser asking you the operation you would like to use with the DWF file. I could not find a way to make this the default operation.

Of course all these methods will not work if the Vault does not contain DWF or DWFx files for all checked in CAD files. There is a "Update Visualization" icon on the file viewing page in the ATC which can be used to update or create a missing visualization file in the Vault. Its use is dependent on the Autodesk Job Processor availability. Check with your Vault administrator before attempting to use this function.
If a DWF or DWFx file does not exist in the Vault for the file you are attempting to view, the "Actions" icon will show the option to download the actual file itself. This is not normally a desirable action and Autodesk is currently working on a fix to the situation.

Monday, May 8, 2017
Recalling Vault History using Labels
There is a tool found in all versions of Autodesk Vault that will make your job of recalling Inventor designs a walk in the park. The tool is called "Labels", but before I jump in and talk about the process of using labels, I want to give you a couple of scenarios just to give you a reason to use this marvelous tool.
Scenario 1: Your company designs equipment in Autodesk Inventor that will go through numerous changes during its usable life. Let's say the original equipment design was created in February, 2017, the design was locked down and 50 assemblies of this design were shipped soon after. Now we will turn the clock ahead to July, 2017 and your company determines that the original equipment design needs to be revised and improved for a new customer who has ordered 60 assemblies. Your company design team is worried about revising the original design files because they may not be able to remember the design as it was shipped for the original 50 assemblies. What if the original equipment needs replacement parts? What if the customer who ordered the first 50 assemblies whats some design changes? This is a great use of the "Labels" command inside the Autodesk Vault application.
Scenario 2: Your company creates a particular consumer product. The product is originally designed and manufactured in large quantities. The production design is assigned a model number to identify the particular design. Well into the production, it is discovered that a small change would increase sales so the engineering team needs to start with the revision of the original design and wonders the best method of retaining the the original model number design while moving quickly ahead on the creation of the newer model required by sales. They know they must retain the original model's design in order to support their replacement part division as well as making sure they can document the original model for regulator bodies.
Both of these scenarios have a number of solutions but most of them are very time consuming and subject to error, take a vast amount of time and probably will create confusion as time passes and memories fade. Many companies will simply copy all the Inventor models and drawings to a safe protected folder so they can retrieve them if and when they are needed. Some companies will create reams of production drawings with the hope they can find the correct one if an older model has to be reconstructed. The Autodesk Vault offers an effective, quick, and simple solution to these types of situations and the process will not depend on someone retaining past design knowledge for years or even decades. Vault "Labels" are the answer so let me give you an example to show you how it works.
I will first give you two views of the completed design of my companies product. The design is finished and all supporting models and drawings have been created using Autodesk Inventor and checked into the Autodesk Vault. Production will start next week.


Take a second to understand the file count in my label. The label says that 43 files have been labeled and will be bookmarked at this point in their Vault history. Why 43 when there are only 21 objects listed in my folder. Well we must not forget about the visualization files which makes 42 and one Word document attached to the top level assembly calling out the boxing materials needed for shipment.

This is the contents of the Word document so you can see the affect of labels on attachments as well.
 The label has been created, a label bookmark of the current state of 43 files has been place in the Vault. Select "Close" to finish. The design modifications, required for the new customer, can take place using the original files with the confidence you can return to the current design at any time. The changes to the assembly, parts and drawings are indicated below and checked into the Vault. The addition of the indicated line to the Word document have also been checked into the Vault. The new design is finished and production begins on the second customers 250 assemblies.

 We will imagine that some time has passed and then the customer who purchased the 100 original design assemblies calls and ask for 4 replacement assembly bases. It is time to use our Vault "Label" created earlier. A Vault user with "Document Editor (Level 1)" or higher security clearance logs into the Vault and select "Labels" from the Tools menu. The Labels dialog box offers two methods of securing the complete history of the original design. The "Restore" option will version up all 43 original documents becoming the current Vault version. This option may not be what you desire since you would like to leave the Vault showing the modified assembly created for the second customer. You could preserve the current Vault folder version by making another Label, then restore the previous Label. After completing the changes to the assembly required by customer 1, restore the current assembly label. This is a decision for your engineering department.
Many Vault users will elect to use the second option to do a "Pack and Go" to a separate folder under the Vault workspace and edit from these models and drawings. Whichever method you choose, an accurate recalling of the Vault history makes the job an easy, fast and accurate task.

I decided to create a current customer 2 design label and then use the "Restore" option. Once I am finished, I would probably make another label to bookmark the revised assembly for customer 1 then "Restore" the current design for customer 2 using my label. Once this label was restored, it can be deleted. This may seem a little confusing but with proper description and names, labels can be managed easily especially if only one in the engineering group handles all labels.
I will only bore you with one screenshot confirming that the label worked but you can trust me, it placed all objects to a new version using the "Label" older versions.

Two things I want to emphasis. First, Vault labels will not recover a deleted object. If you have deleted a model and drawing since the label was created, executing the label "Restore" will not bring it back. Second, you can have as many Vault Labels as you desire, just take my advice and annotate them well. If you do create and maintain numerous labels and later on your Vault administrator decides to do a purge versions history from the Vault, remember that all versions relating to saved labels cannot be purged.
I encourage you to test Vault Labels on one of your small Inventor assemblies and see first hand how valuable this tool can be.
Scenario 1: Your company designs equipment in Autodesk Inventor that will go through numerous changes during its usable life. Let's say the original equipment design was created in February, 2017, the design was locked down and 50 assemblies of this design were shipped soon after. Now we will turn the clock ahead to July, 2017 and your company determines that the original equipment design needs to be revised and improved for a new customer who has ordered 60 assemblies. Your company design team is worried about revising the original design files because they may not be able to remember the design as it was shipped for the original 50 assemblies. What if the original equipment needs replacement parts? What if the customer who ordered the first 50 assemblies whats some design changes? This is a great use of the "Labels" command inside the Autodesk Vault application.
Scenario 2: Your company creates a particular consumer product. The product is originally designed and manufactured in large quantities. The production design is assigned a model number to identify the particular design. Well into the production, it is discovered that a small change would increase sales so the engineering team needs to start with the revision of the original design and wonders the best method of retaining the the original model number design while moving quickly ahead on the creation of the newer model required by sales. They know they must retain the original model's design in order to support their replacement part division as well as making sure they can document the original model for regulator bodies.
Both of these scenarios have a number of solutions but most of them are very time consuming and subject to error, take a vast amount of time and probably will create confusion as time passes and memories fade. Many companies will simply copy all the Inventor models and drawings to a safe protected folder so they can retrieve them if and when they are needed. Some companies will create reams of production drawings with the hope they can find the correct one if an older model has to be reconstructed. The Autodesk Vault offers an effective, quick, and simple solution to these types of situations and the process will not depend on someone retaining past design knowledge for years or even decades. Vault "Labels" are the answer so let me give you an example to show you how it works.
I will first give you two views of the completed design of my companies product. The design is finished and all supporting models and drawings have been created using Autodesk Inventor and checked into the Autodesk Vault. Production will start next week.


The production run is complete and the first 100 assemblies have been shipped. During the production run, another customer has ordered 250 assemblies of the same design except they want two changes to two different parts, the vertical post and the base. The engineering department needs the new final design quickly but must preserve the initial design for replacement parts and support of current production. The first step is to create a "Label" in the Vault which essentially is a "historical design bookmark" between the original design and the modifications required for the new design.
A Vault user with "Document Editor (Level 1)", or higher, security logs into the Vault, and selects the "Labels" tool from the Tools menu.

In the Labels dialog box, left click on the "New" icon to open the New Label dialog box. The first thing it to select the target location of the label. Using the three dots at the end of the field, browse to the folder containing the completed original design. This step should point out to your Vault manager the importance of good Vault folder structure and keeping all related design documentation under one folder. Next give the label a very descriptive name so you can identify it easily in the future along with a description if it will help you identify the label when memories fade or the individual who created it is not available. Select "OK" at the bottom of the dialog to finish and return to the Labels dialog box. By the way, the only thing you can edit, once you create a label, is the name and description so take you time and select the correct folder.


Many Vault users will elect to use the second option to do a "Pack and Go" to a separate folder under the Vault workspace and edit from these models and drawings. Whichever method you choose, an accurate recalling of the Vault history makes the job an easy, fast and accurate task.

I decided to create a current customer 2 design label and then use the "Restore" option. Once I am finished, I would probably make another label to bookmark the revised assembly for customer 1 then "Restore" the current design for customer 2 using my label. Once this label was restored, it can be deleted. This may seem a little confusing but with proper description and names, labels can be managed easily especially if only one in the engineering group handles all labels.
I will only bore you with one screenshot confirming that the label worked but you can trust me, it placed all objects to a new version using the "Label" older versions.

Two things I want to emphasis. First, Vault labels will not recover a deleted object. If you have deleted a model and drawing since the label was created, executing the label "Restore" will not bring it back. Second, you can have as many Vault Labels as you desire, just take my advice and annotate them well. If you do create and maintain numerous labels and later on your Vault administrator decides to do a purge versions history from the Vault, remember that all versions relating to saved labels cannot be purged.
I encourage you to test Vault Labels on one of your small Inventor assemblies and see first hand how valuable this tool can be.
Subscribe to:
Posts (Atom)