This article will not cover the use of Autoloader but will explain how to configure the default Vault workspace and library folder used by the application. By default the Vault workspace folder must be named "Designs" and the library folder must be "Libraries" in order to use the Autoloader. Theses names may not be acceptable to your company. In this example I have named my Vault workspace folder "Projects" and I used the default library folder name of "Libraries".
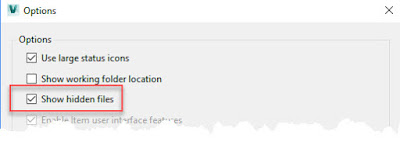
The first step is to configure the Vault Client to "Show hidden files". Select "Tools" from the menu bar and then "Options" from the drop down list.
In the Options dialog box, place a check box is the box before "Show hidden files". Select "OK" at the bottom of the dialog box to finish.
If you have not run the Autodesk Autoloader since you created the company Vault database you will not see the necessary configuration file. Navigate in your Windows program directory and run the Autodesk Autoloader <version> for <Vault type>. You will run the application and allow it to create the default configuration file in the Project Explorer ($) folder. On the first screen simply select "Next" to move to the Select Data Source dialog box. Use the "Select Folder" icon to browse to the folder containing the CAD files you want to add to the Vault. It is not import which folder you select but make sure the folder contains some CAD files. In my case my folder contains a small Inventor assembly, parts and 2D drawings. Select "OK" to continue.
You will immediately will be placed into the "Select Project" dialog box. Here you will
"Browse" and select the Inventor project file which will resolve all the files in the folder selected above. This is a topic in itself and I will not cover the ins and outs of which Inventor project file to use in this article. Double left clicking on the project file will place a check mark beside it. Select "OK" to continue.
You will now see a listing of the files, and folders if they exist, under the folder you select earlier. You can remove any files or folders you desire because you actually only need one file to continue with the process. Select "Next" to continue.
In the Data Scan & Report dialog box, select "Scan" to start the file validation process. Once the process in complete you will receive an alert saying the process in complete. At this point the "Errors in validation" count must be "0" or the "Next" button will not be available. If there is an error in validation the dialog box will inform you of the problem beside each file in the "Status" column. I will assume you can select "OK" to close the completion dialog box and then the "Next" icon to move on.
The next dialog box is the familiar Vault log-in dialog box. You must have administrator privileges to log in when using the Autoloader. Once you enter your credentials, select "OK" to continue.
In the Map Vault Folders dialog box, I am going to select the "Target Location ..." to select the location for the placement of the DP Unit files. In the resulting dialog box Mapping for "DP Unit", you will notice I do not have a choice of selecting my "Projects" workspace only the default "Designs" which is default. Select "Cancel" in the Mapping for "DP Unit" dialog box to close it.
I will do the same thing for the Standard Parts "Target Location...". This time the availability of the "Libraries" folder is present so the default location suits my purpose.
I must stop the process and correct the target location for the non-library files. Select "Cancel" on the Mapping for "Standard Parts" dialog box to close it and then select "Cancel" on the Map Vault Folders dialog box to end the Autoloader process. Acknowledge the message you wish to quit the application.
Move back to the Vault Client and select "Refresh" from the menu bar or press "F5" on the keyboard. You will notice a configuration file called "BUU.xml" shows up in the Project Explorer ($) folder which was created by the Autoloader process I just finished. You will also notice a new "Designs.ipj" Inventor project file which was created by the Autoloader. We will remove this is a minute.
The next thing is the right click on the "BUU.xml" file and select "Check Out" to get a copy to your local Vault workspace and to make it available to modify. Next right click on it again and select "Go to Working Folder". This will place you in your local workspace ready to edit the .xml file.
Using the Windows Notepad application, open the "BUU.xml" file. There are only two lines that you may need to modify, in my case only one since the "Libraries" entry is correct. For my situation all I will change is the word "Designs" to "Projects" to match my Vault workspace folder name. Once this is done, save and close the text file.
Back in the Vault Client, right click on the "BUU.xml" file and select "Check in.." from the context menu. There is really no need to add a comment to the Check in dialog box since the file is normally hidden. Select "OK" to finish the check in process.
Next right click on the "Designs.ipj" file and delete it from the Vault. Next select "Tools" from the Vault Client menu and then "Options" from the drop down menu. Deselect the "Show hidden files" then "OK' to close the Options dialog box.
I am finished with the configuration change. The next time I use the Autoloader the "Projects" folder will be available for mapping the non-library files.
It is a long process but you only have to do it once for each company Vault which is normally only one.


No comments:
Post a Comment