Showing posts with label Vault. Show all posts

Thursday, July 20, 2017

Creating Autodesk Vault Viewing Filters

Autodesk Vault offers a myriad of ways to find, filter or sort file types in order to define a specific group of files for viewing or other operations.  In this article I would like to focus on the filter options.  For example, in a Vault folder I would like to filter the "Entity Type" column to only show Inventor IDW files.  A filter applied to the column can quickly filter out all other file types as shown below.  Notice the filter call-out shown at the bottom of the list.


The first thing I want to show are the two basic ways to add a filter to the contents of the current displayed Vault folder.  All of my work will be done using the Main Panel display.  I will be using the "Entity Type" column but all these methods can be applied to any visible column.  I want to create a filter to show only the Inventor IPT files.  In one method, I left  click on the small "down arrow" icon in the upper right corner of the column header.  In the case of the "Entity Type" column header it can be hard to see but you can easily hit it with a little practice.  Below I am showing this arrow in "Name" column just to show you the location.
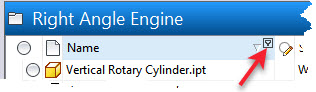


Left clicking on this icon in the "Entity Type" column will display the option dialog box.  It is pretty obvious the first method to create the filter is to simply select the file extension desired from the list.  The list, by the way, only shows the available files types contained in this folder.  I will select ".ipt" from the list to set the filter.


The result will be as shown.


The second method in located the same left click menu and is not quite as straight forward as the first method but it also offers more options.  Select "(Custom)" from the list.


In the Custom AutoFilter dialog box you can select the first column drop-down arrow to pick the condition the filter will use and the second column drop-down arrow to pick from the type of files contained in the folder.  The dialog box also offer the opportunity to add another set of conditions and file types using a Boolean "And" "Or" statement.  My selection below will filter the folder to show only IPT or IDW files.


During the same Vault Client session, after a filter has been applied to a folder using the drop down list, the previous filter selection(s) will be displayed  above the double line allowing for quick selection.  You can use the "X" to remove these if desired.


Once you have created a folder filter, the current filter will appear at the bottom of the folder.  There are a few controls located on this filter display which are described below.


  1. Selecting the "X" will remove the folder filter.  Once removed you will have to create another one to access these controls.
  2. Selecting the check mark will temporarily deactivate the folder filter.  Selecting it a second time will make the filter active.
  3. Selection the drop down arrow will revel any previous filters which were created for this folder during the current computer session.  Filters are maintained between Vault sessions under certain circumstances.  Selecting one of these filters will make it active.
  4. If the drop down list is showing, you can select the "X" to remove the related filter from the list.
If you would like to edit the current active filter, select the "Edit Filter" icon located on the same display bar at the right hand side.


Once in the Filter Editor dialog box, the options are almost endless.  Left clicking on individual entries will display options related to the entry you selected.  For example, if I select the "Or" in the filter editor it will display the other possible conditions.


Each word of each filter is linked to other options so I suggest you spend a couple of minutes and just left click on everything to see some of the possibilities.  You have the ability to add and remove filters in the editor as well.


Once you are finished, select either "Apply" or "OK" depending on your needs to finish the editing process.

Once you have applied filters to a folder, you need to learn when they are applied and when they are automatically removed.   Filters applied to one folder are also applied to other folders when selected from the Navigation Panel.  There are exceptions to this rule and I will let you find them yourself.  Using a "Shortcut" will automatically remove a filter unless the shortcut was created on a folder containing a filter.  In this case the shortcut will set the folder current and automatically apply the filter condition when it is selected.  You cannot remove the filter and then expect the shortcut to return the filter however.

The last thing I would like to mention is how to save a filter as a configured Vault Client view.  The first thing to do is create an "empty" custom view.  Select the drop down arrow in the view display window and pick "Define custom views..." from the list.


In the Manage Custom Views dialog box, select "New" and create a view name which describes what the view will display.   Select "OK" to create the new view.


At this point you could configure the new view from this dialog box using the "Modify.." icon but this time I want to show you how to modify the view by creating a folder filter.  Select "Close" to return to the full Vault Client display.  Notice that the view I just created is displayed in the view window.  If you selected another folder, the view will be set back to Default View.  Select a folder that contains some IDW files and then reset the view window to IDW Files Only.


Next, create a filter to show only IDW files in the current folder using one of the methods shown earlier.  Next right click on the Entity Type column header and select "Apply Setting To Current View" from the context menu.


This will assign the filter to the IDW Files Only view saving it for future use in other folders. One thing to keep in mind, these views are only active in the folders they were selecting in.  If you select a different folder, the view will return to Default View.  While in the new folder selecting the view IDW Files Only will assign that view to the current folder until you change the view again even if the application is closed and then restarted.

Creating the filters and views you need for effective use of the Vault Client is an easy way to only display the files you need for certain tasks.  I will leave you with the reminder that filters can be applied to ANY column including custom columns created from your custom Vault properties.


Thursday, July 13, 2017

Using Inventor "Notes" as a Mini Vault

Inventor "Create Notes" function probably does not get a lot of use but for those who unfortunately do not have access to the Autodesk Vault, this feature can be turned into a mini Vault.  In this article I will outline the process of saving model versions, with images, using the "Create Note" command.  I know you can do this if you configure your Inventor project file to keep an unlimited numbers of "Old Versions" but that is across all Inventor files and can get cumbersome.

I will be using a part model but the process will work with assemblies as well.  I would not recommend it though because tracking the necessary part versions will be problematic.  You need to install the Autodesk Vault to handle assemblies effectively.  My part is a mounting post for a gearbox with a file name of 563549.ipt which will become important later in the article.  I am showing the browser so you can see the feature callouts.


An edit of the part is required, starting the process of capturing a version using the Inventor "Create Note" function.  Right click on the part name at the top of the browser and select "Create Note" from the context menu.


The first thing to do, after the Inventor notebook opens, is to remember to "Freeze" the thumbnail image so you will have a visual record of the current version.  Right click over the image and select "Freeze" from the context menu.  This prevents the image from updating as changes are made to the model later on.


Next, lazy left click the note name in the notebook browser.  Give it a descriptive name to help you remember this version.  Since this is my original, that will be my name.  You can also add dialog to the note box as well if desired.  


The next step is the main step in the process.  You will be using the "Insert Object" command to place a copy of the current Inventor part into the note area.  Select the "Insert Object" command in the Insert panel.


In the Insert Object dialog box, select the "Create from File" radio button, select "Browse" and navigate to the current part file, in my case it is 563549.ipt.  Place a check file in the "Display As Icon" box and then select "OK" to finish.  


The file will be added to the current "Comment" dialog box.  You may have to rearrange the box if needed.  You have finished capturing the current version, select the "Finish Notebook" command on the Exit panel.


The next thing is to save your part file then you can start making your version edits.  I am going to speed up the process and make two more version notes using the same process outlined above.   One important thing to remember is to make sure you save the part before using the "Insert Object" tool during the creation of any further version creations.  This will make sure the file will be representative of the desired version if it is ever restored.  Below are the image files from each version to make sure you understand my changes.


Time passes and I need to capture the design of the second version "Remove bar holes and Wrench Flats".  The first step is to open up the current file containing the three versions.  Next you need to use the "Save As" command to save the part file under a different name.  The name and file location is not important but the current file cannot have the same name as the file you will be restoring.  For my example I will choose 563549-1.


While in the newly renamed part file, highlight the note created from the version you would like to restore, right click and select "Display Note" from the context menu. 


Select the inserted object file then right click and select "Copy" from the context menu.


Exit the Engineer's Notebook and browse to the folder you would like to "Paste" the part version.  I am going to place it in the original folder, replacing the original file when prompted.  Returning to Inventor open up the part file to show you have restored one of the previous versions.  You could go back at anytime and restore an other version if needed. 

This process can be used to attach a different reference files or documents if needed.  Capturing an image will have to be done with an a screen capture application and pasted into the Engineer's Notebook if you desire an image.