Thursday, April 26, 2018

Manual Fix for Inventor 2019 Styles Library Manager Migration Issue

As you may or may not know, when you try an migrate Inventor 2018 Design Data (Styles) to 2019 using the Inventor 2019 Style Library Manager the process would not finish.  The “Migrate” icon at the bottom of the dialog box would never go out.  This would mean you could not use the Style Manager to edit the styles library in any way. 

 
They have released a “Manual” method of fixing this which is very simple.  They are working on a more formal update later.  The process is:

  1. Migrate your Styles library to 2019 using the Inventor 2019 Style Library Manager as you would normally do.
  2. Exit the Style Library Manager.
  3. Using your favorite text editor, modify the “Weld.xml” file in the Design Data folder to the match the following screen capture.  Change the <Weld Version=”1”>  to <Weld Version=”3”> as shown. 


After the change you can use the Inventor 2019 Styles Library Manager to modify the styles as required.


Saturday, April 7, 2018

Motion Links Between Joints in Autodesk Fusion 360

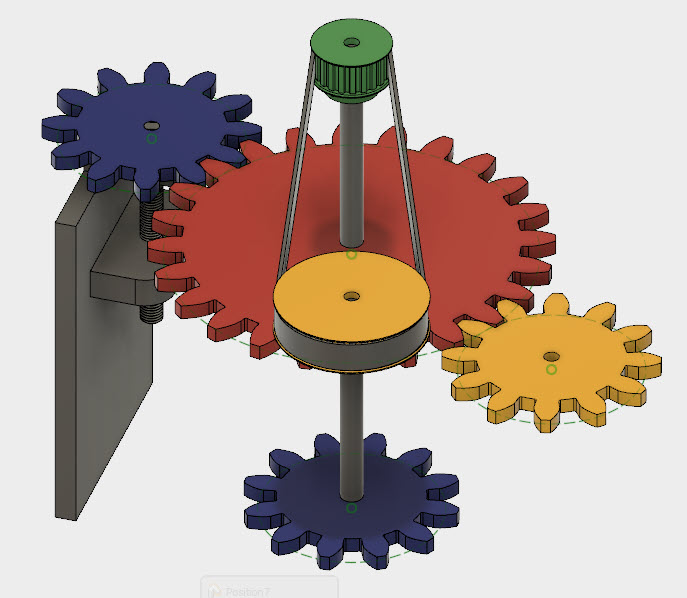
Many of your Autodesk Fusion 360 assemblies will contain component joints which need to be linked together to show accurate and realistic motion.  For example two timing pulleys or two spur gears that need to be animated as a pair to add realism to your model.  I have created a short video showing you how to apply motion links between existing assembly joints. 


Sunday, February 25, 2018

Lofting with Rails in Autodesk Fusion 360

Lofted models can be created in Autodesk Fusion 360 using three basic methods, free between multiple profiles, along a center line between multiple profiles and using rails connecting multiple profiles.  In this short video I demonstrate why lofting with rails is the best method to get a true shape especially when one or more of the loft profiles in an irregular shape.  I also demonstrate an easy method of sketching your lofting rails so they intersect each loft profile which is a requirement.


Sunday, February 18, 2018

Projected Isometric Sectional View in Autodesk Fusion 360

A unique method of creating a drawing of a part or assembly, in Autodesk Fusion 360, is to create a projected isometric view of a section.  These type of drawings make excellent presentation and manual drawings which add a interesting point of view.  Most sectional views can be used to create a projected view except one containing an angled section line.  I have created a short video showing you the process for making a drawing with this type of view and also demonstrated the one type of sectional view that cannot be used.


Friday, February 16, 2018

Remove the Burden of Add-Ins in Inventor

What I am proposing, in this article, is not for every Inventor user but for some, like myself, it gives my use of Inventor that little boast that makes modeling more enjoyable.   Windows applications are notorious for becoming bloated with extensions, add-ins and services that are necessary, some of the time, but not all the time.  Stop and take a look at all the extensions and add-ins you have installed on your favorite internet browser.  Autodesk Inventor is no different.  Right out of the box and over time the installed Add-Ins will become excessive.  Every time you start Inventor, these Add-Ins load up waiting for your use, which in a lot of cases, never comes, at least not on a regular basis.  

I will be the first to admit I love to have all the features these Add-Ins bring to my Inventor experience but I also admit I do not like the constant wait for them to load over and over and then I only use them once in awhile.  I therefore would like to propose that you remove the Add-Ins until you actually need them.   First, take a look at all the Add-Ins you currently have loaded by opening the Add-In dialog box.  Select Tools, Add-Ins to bring up the list.

 You will probably be surprised at the number and the purpose of each.  While you are scanning the list, notice that they are probably all currently loaded.   You can read a brief description of each in the "Description" box on the lower left side.  Do not be embarrassed if you cannot tell what each one is for.


 You may notice that I only have a few loaded, these are the ones I need every time I use Inventor.   The rest are always available and can be loaded by visiting this dialog box and selecting "Loaded/Unload" check box under Load Behavior.  Since most are not checked to "Load Automatically"  this gives my Inventor application that little boost that enhances my Inventor experience.  I will admit this boost will not set the world on fire but every little bit helps.

When I do need an Add-In I check the box "Loaded/Unloaded" and do not select the "Load Automatically".  This makes sure that my standard Add-Ins selections are the only ones loaded the next time I use Inventor.

If you want to try my idea, uncheck the two boxes.  Some of the Add-Ins will be unloaded immediately but others will require an Inventor restart.  On some of the Add-Ins, if you check "Loaded/Unloaded" to make them available during your Inventor session, they cannot be "Unloaded" manually but will be unloaded the next time you restart Inventor.  Of course this depends on if you check "Load Automatically" or not.  In the screen capture below I have checked iCopy and you will notice the "Loaded/Unloaded" check box is grayed out, this is an example of one that loads for the full Inventor session.

I must stress one important point before I finish this article.  Please, Please remember you have turned off your Add-Ins so do not call tech-support if you cannot find your Frame Generator or Assembly Bonus Tools or at least accept their frowns when you do and don't blame me.